
Time to Calibrate Your Lens | Tutorial
I bet some of you got new lenses during the holiday season. Did you try them out but were a little disappointed? They weren't as sharp as you thought they'd be? Maybe you just need to calibrate your lens to your camera body. It seems like you shouldn't have to do that with a new lens, but sometimes you do.Sounds scary, but it is so easy!!! Let me walk you through.
Calibrate Your Lens

Calibrate your Lens - Nadeen Flynn Photography
The first thing to do is put your camera with the lens that's causing you issues on a tripod and set the shutter timer (along with all the correct exposure settings). Both of those things will ensure that there is no camera shake. Next, you want to lay down a ruler or calibration sheet (Copyright Tim Jackson 2004) like I have here on a table (or floor depending on the lens). Tape it down. We don't want that moving either! You will angle your lens at 45 degrees to the ruler and about 15 to 18 inches away depending on the range of the lens. Here is what that should look like:
Focus on a specific area of the ruler. I prefer to use a magnified 'live view' so I can manually focus as carefully as possible. Do not use auto focus. In this case I focused on the heavy line in the middle of the paper where it says “Focus Here”. If you are using a ruler or tape measure, you could choose the 13” line (anywhere there is info on each side of the focus point in which to compare). Take the shot. Of course, you can check the back of your camera, but to see it best, look at it on the computer. You want to see the focus point in focus, not in front nor in back. Here, my lens is focusing in front (around 6mm and 10mm). The numbers on each side of the focus point should be equally in focus. Time for some calibrating magic!

Calibrating
Or Use a Tape Measure
Just to give you another example, here is an image using a tape measure with the camera focussed on 13 and a different lens. It looks like it's back focussing slightly.

lens calibration
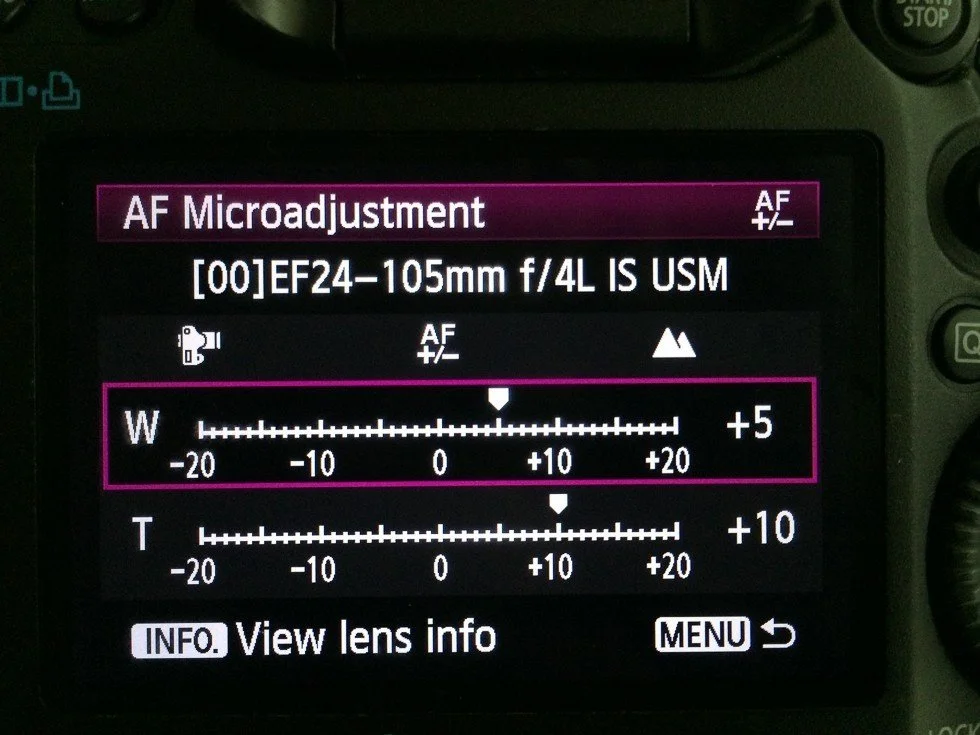
Using my camera manual, I go to the section called “Adjust by Lens” which walks me through the next few steps. (I'm Canon so Nikon may call it something slightly different.) Following the manual's instructions, I go to AF Micro-adjustment in the menu and adjust by lens. In this case, I'm adjusting my 24-105 (different from the picture above). The W (wide - 24) has been adjusted previously, but the T (telephoto - 105) is front focussing. I move the dial to the T and begin to adjust. My manual tells me to move the dial to the right toward little mountain range icon to move the point of focus back. Then I take another picture to see where I've moved the point of focus. It's usually necessary to do this several times to get the focus point right where you want it. In my case I ended up adjusting +10. Looks great and my camera will now 'remember' the setting specific to the lens.

calibration success
Camera Microadjustment Menu
calibrate your lens
This is what the back of my camera looks like after calibrating both the W (wide @ 24) and T (telephoto @ 105) settings for my 24-105.
There are lots of programs, gadgets, and companies out there to help with microcalibration, but this has worked for me. Calibrating is easy, relatively quick, cheap, and just takes a little patience. If you feel like you've got a lens that has some soft focus issues, give this a try. I was so nervous the first time I tried this thinking I would break something, but really you cannot hurt anything! Give it a try!I found the focus chart online (Copyright Tim Jackson 2004). Although his website is no longer active, you can find it here on page 18 in a document he wrote on the topic:
http://www.dphotojournal.com/focus-test-chart.pdf
.
DO NOT CLICK ON “The latest version is always available at ...” on that website. It will send you to a bogus site. There is only one version and it's on page 18 of the article on dphotojournal.com.
Happy calibrating!
*****
Are you looking for a break in your everyday? Join me for my Life Exposed still life photography workshop/retreat on the northern California coast this spring. All levels are welcome. It's a still life workshop, a retreat, a getaway, a time to bond with other female photographers, a chance to explore and photograph the area.
Find out more here: Life Exposed
*****
All landscape, fine art, and still life images are available for purchase.
Please CONTACT ME at nadeen@nadeenflynn.com to purchase prints or schedule your learning session.
Nadeen Flynn is a published northern California fine art photographer. Living in the greater Sacramento area, she specializes in fine art landscape and still life photography. She offers in-person workshops, hourly lessons, and mentoring. While currently living in rural northern California with her husband and a couple thousand walnut trees, she posts regularly to Instagram.
Locations include Yuba City/Marysville, East Nicolaus, Wheatland, Lincoln, Woodland, Roseville, Rocklin, and Sacramento areas.
(530) 633-7575